Once you have imported or created your WebApps, you can access WebApp layouts.
File Structure
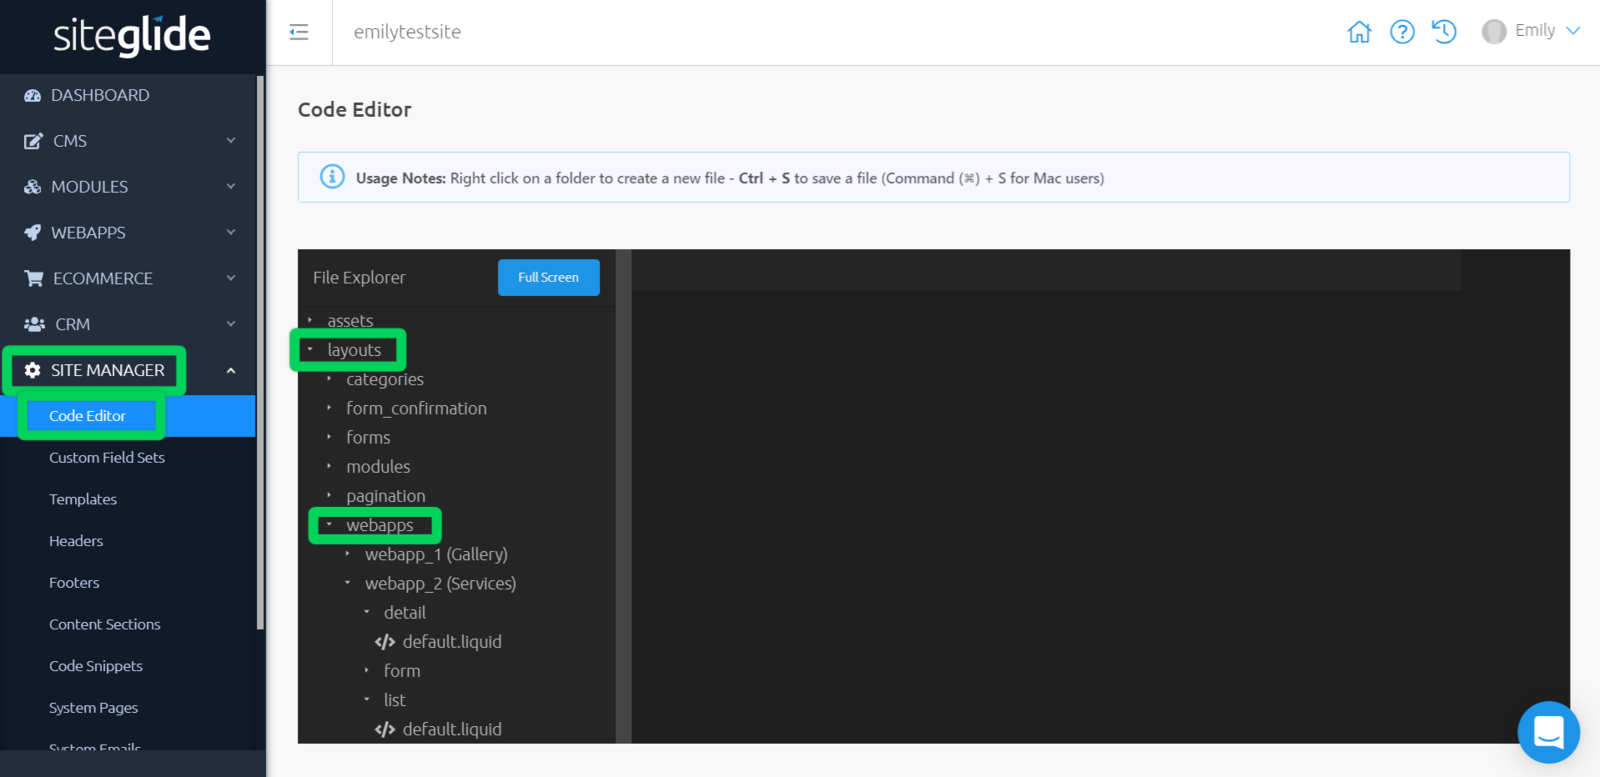
Code Editor can be found within Site Manager in the left-hand Menu. Use the screenshot below to help you find the WebApp you want to add a custom layout to:

You will find a default Detail Layout stored within:
layouts/webapps/webapp name/detail/
and you should create any custom detail layouts for the WebApp beside it. Click on the button on the right of the detail folder to do this.You will find a default List Layout stored within:
layouts/webapps/webapp name/list/
and you should create any custom list layouts for the WebApp beside it. Click on the button on the right of the list folder to do this.
Once you have saved custom Layouts in these folders, Toolbox will automatically find them and offer you the option of selecting them when outputting WebApps on a page.
Copying over Layouts
After running a Static Site Import for this Site, you'll need to cut WebApp layouts from your Pages where they are.
Then, create the layout within the correct detail or list folder in Code Editor and paste it in. Now all that's left to do is update the liquid to match the Siteglide fields. You can use the "Insert field" dropdown along the top of Code Editor to automatically output the liquid for each field.
Example BC Layout:
<div class="medium-6 columns end portfolioList"> <div class="ministry-box box-inner"> <div class="row"> <div class="medium-12 columns"> <a href="{tag_itemurl_withhost}"> <img src="{tag_list - image_value}"> </a> </div> <div class="medium-12 columns portfolioListText"> <h3>{tag_name}</h3> <span class="portfolioListDescription">{tag_list - description}</span> <p class="portfolioListButton"> <a href="{tag_itemurl_withhost}" class="button tiny">{tag_link text}</a> </p> </div> </div> </div> </div>
Example Siteglide Layout:
<div class="medium-6 columns end portfolioList"> <div class="ministry-box box-inner"> <div class="row"> <div class="medium-12 columns"> <a href="{{this['full_slug']}}"> <img src="{{this['List - Image'] | asset_url}}" alt="{{item.properties.name}}" /> </a> </div> <div class="medium-12 columns portfolioListText"> <h3>{{this['name']}}</h3> <span class="portfolioListDescription">{{this['List - Description']}}</span> <p class="portfolioListButton"> <a href="{{this['slug']}}" class="button tiny">{{this['Link Text']}}</a> </p> </div> </div> </div> </div>
Related Documents:
- Migrations Overview
- Migration Method Checklist
- Migrations- Creating the Siteglide Site
- Static Site Import - How To Use
- Migrating Assets
- Migrating (Importing) WebApps
- Menu Builder Module
- Menus - Getting Started
- Troubleshooting Migrated Menu Layouts
- Code Editor - Introduction
- Migrating Templates
- Templates - Getting Started
- Migrating Forms
- Migrating WebApp Layouts
- How To Put A Site Live
- FAQ - What's the difference between an ID and an external ID?


