

Forms
Forms are extremely versatile on Siteglide and can be used in a number of ways, such as: standard fields for collecting information, basic payment forms for eCommerce, subscriptions for eCommerce, signing up to a Secure Zone area of your Site or subscribing to a list.
Within this doc, you can find helpful information covering Forms, such as:
- Finding Forms
- Creating And Editing Forms
- Form Setup
- Standard Fields
- Adding New Fields
- Adding Custom Fields
- Adding Custom Fields From CRM
- Adding Address Fields From CRM
- Adding Company Fields From CRM
- Adding Custom Field Sets
- Adding Secure Zones
- Adding Payment Methods
- Automations - Autoresponder
- Automations - Workflow
- Spam Protection
- Saving And Editing
- Adding Forms To Pages
- Using With Studio
- Outputting With Toolbox
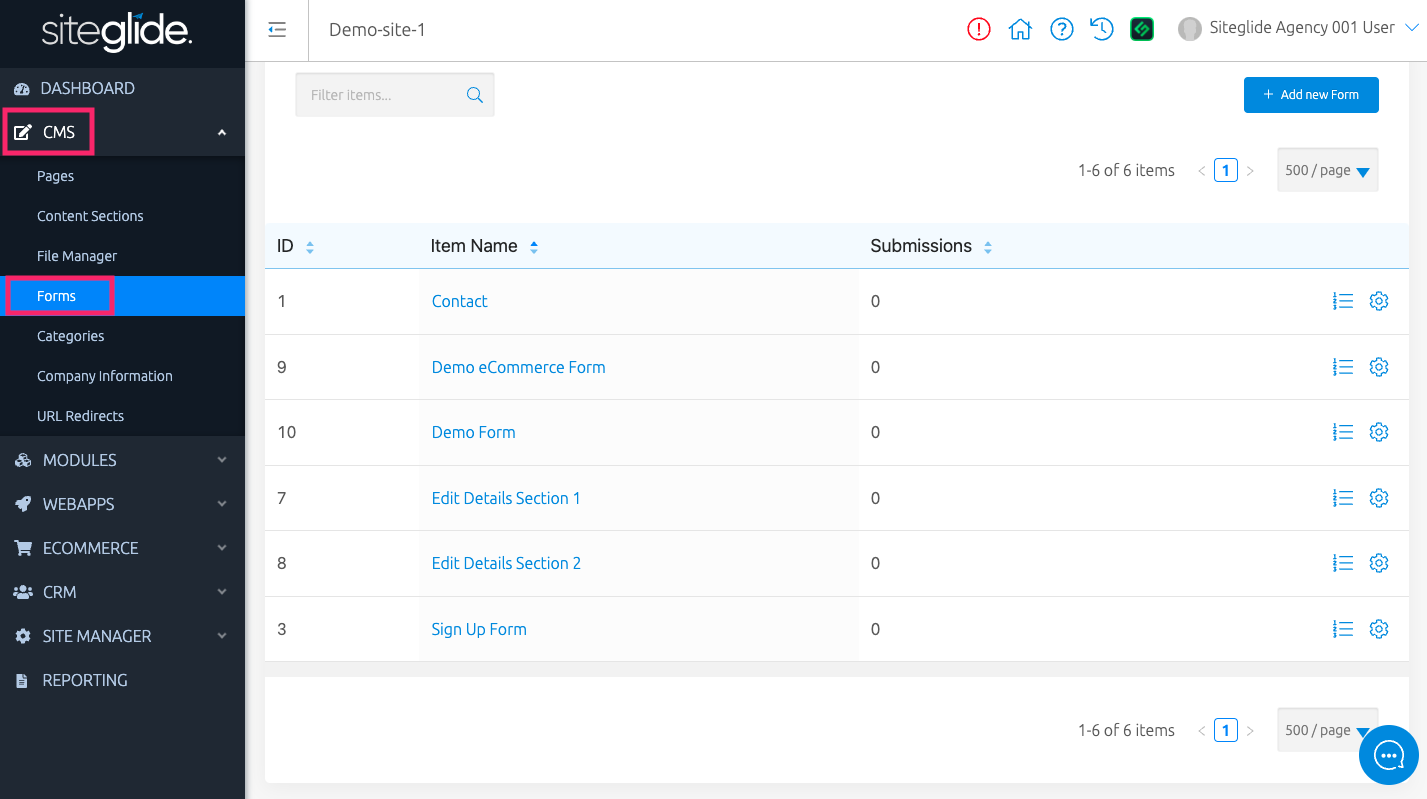
Finding Forms
While viewing your Site Admin, use the left-hand menu to click "CMS" and expand the sub-menu. Next, click on "Forms" to view a list of existing Forms on your Site.
Creating And Editing Forms
Get started with “Add new Form", above your list of Forms, on the right-hand side.
Redirected to where we can create a Form, we can fill in required fields and navigate tab by tab filling in any additional information we’d like to include, along with creating any additional custom fields.
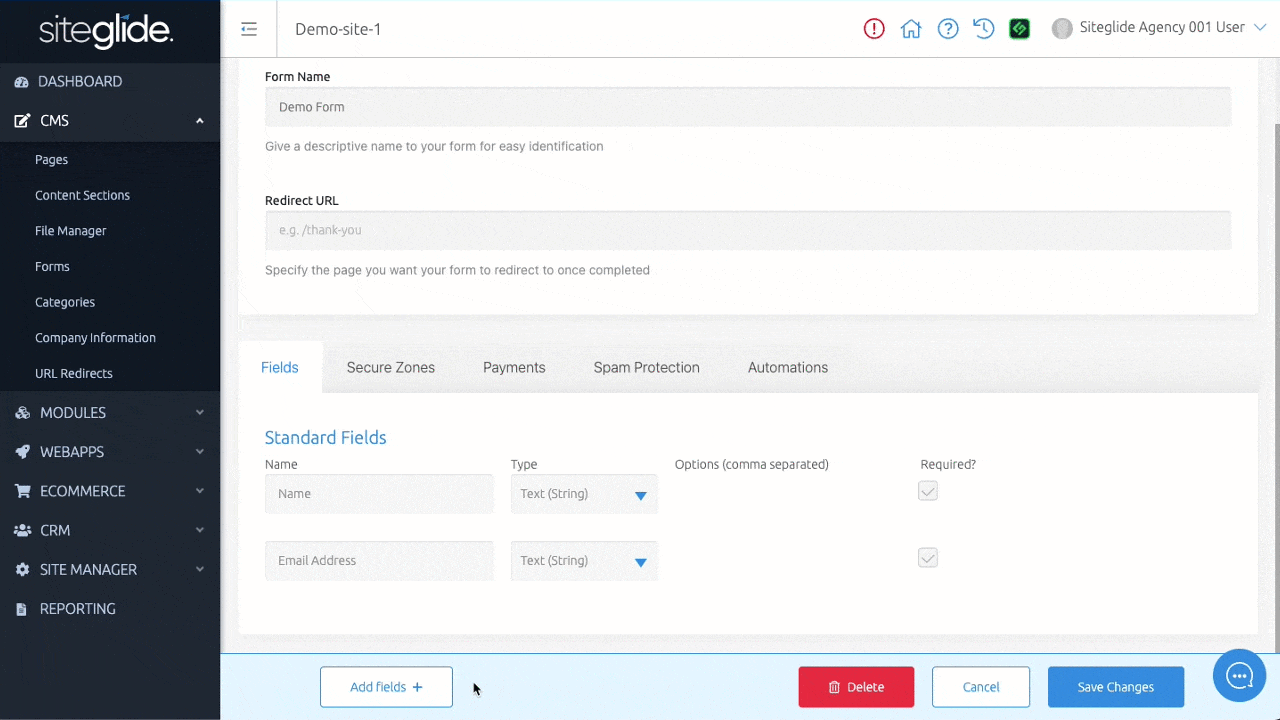
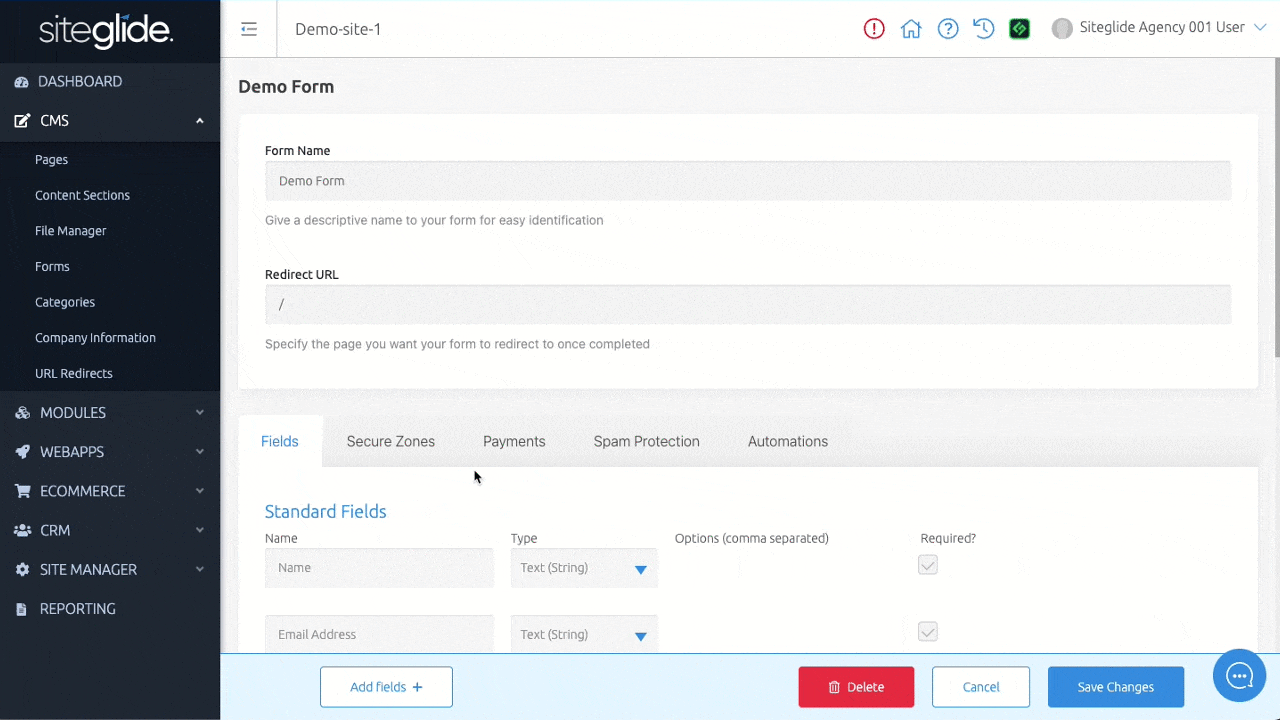
Form Setup
- Form Name (required) - This name will only be shown within Admin. Please do not use special characters
- Redirect URL - This field specifies which page the user is redirected to after they have submitted your form. It requires no initial /, for example; "contact" or "services/my-service" .
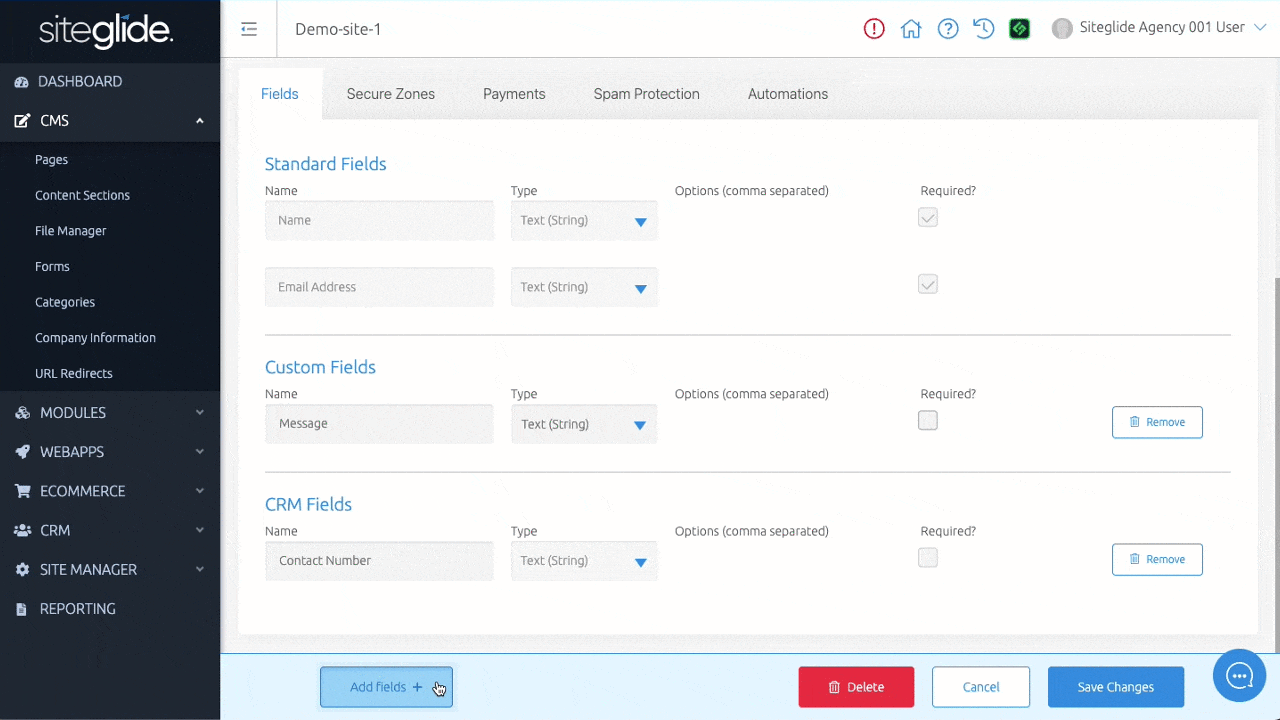
Standard Fields
- Name - Text (String) - Name of user submitting Form
- Email Address - Text (String) - Email address of user submitting Form
Adding New Fields
You can build your Forms using Custom Fields, Custom Fields from CRM, Address Fields from CRM, Company Fields from CRM, and Custom Field Sets using the "Add fields +" button at the bottom when creating or editing a Form.
When you save your Form, the necessary fields will be added to the Form's default layout to copy into any custom layout.
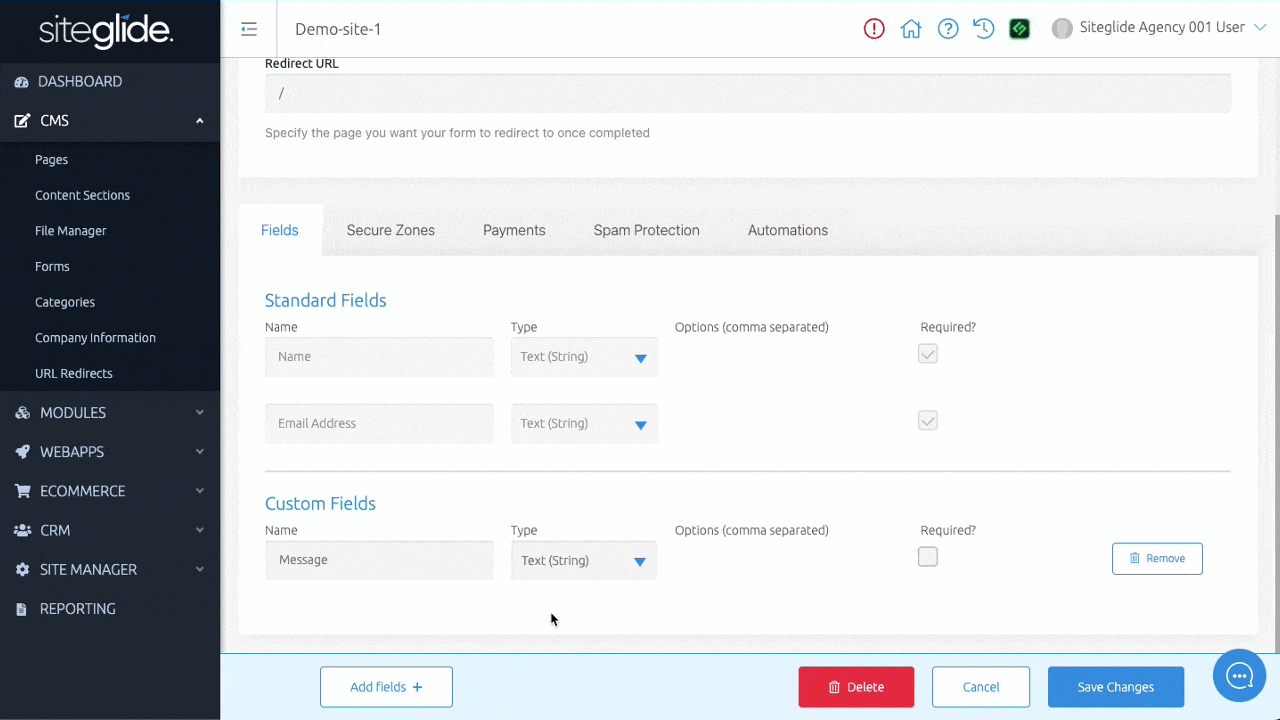
Adding Custom Fields
Custom Fields are fields that you can add and customise to suit a specific Form.
Select "Add fields +" to choose "Add 1 (increase this number if you'd like to add more than one) new Custom Field".
Below is a list of all field types you can currently use:
- Text (String) - Single line text field, used for short text inputs.
- Text (Multiline) - Multiline text field, used for longer text inputs.
- Checkbox - Comma separated e.g. Checkbox 1, Checkbox 2
- Radio Button - Comma separated e.g. Radio 1, Radio 2
- Dropdown (Single Item) - Comma separated e.g. Option 1, Option 2
- Dropdown (Multi Item) - Comma separated e.g. Option 1, Option 2
- File - Media upload field
- Date - Select a date
- Datasource (Single Item) - Select a WebApp / Module that you’d like to pull in the data for on your Form.
- Datasource (Multi-Item) - Select a WebApp / Module that you’d like to pull in the data for on your Form.
You can set any of your custom fields as required/optional via the checkbox next to each field created.
Adding Custom Fields from CRM
These are Custom Fields that have been added to the existing CRM structure.
Select "Add fields +" to choose "Add field from CRM".
If no CRM Custom Fields are available to add, you can create some. Find out more: CRM - Custom Fields
Adding Address Fields from CRM
This includes Address fields that already exist within your CRM.
Select "Add fields +" to choose "Add 1 (increase this number if you'd like to add more than one) new Address".
You will then see each Address added to the field list where you can edit some options:
- Default Name - This is what the Address name will be set as in the CRM if the end-user doesn't change it on their Form submission
- Default Type - This is what the Address type will be set as in the CRM if the end-user doesn't change it on their Form submission
- Billing Address? - (Option only shows for eCommerce Payment Forms) - When selected, this Address will stored as the Billing Address against any eCommerce Orders this Form creates when submitted
- Shipping Address? - (Option only shows for eCommerce Payment Forms) - When selected, this Address will stored as the Shipping Address against any eCommerce Orders this Form creates when submitted
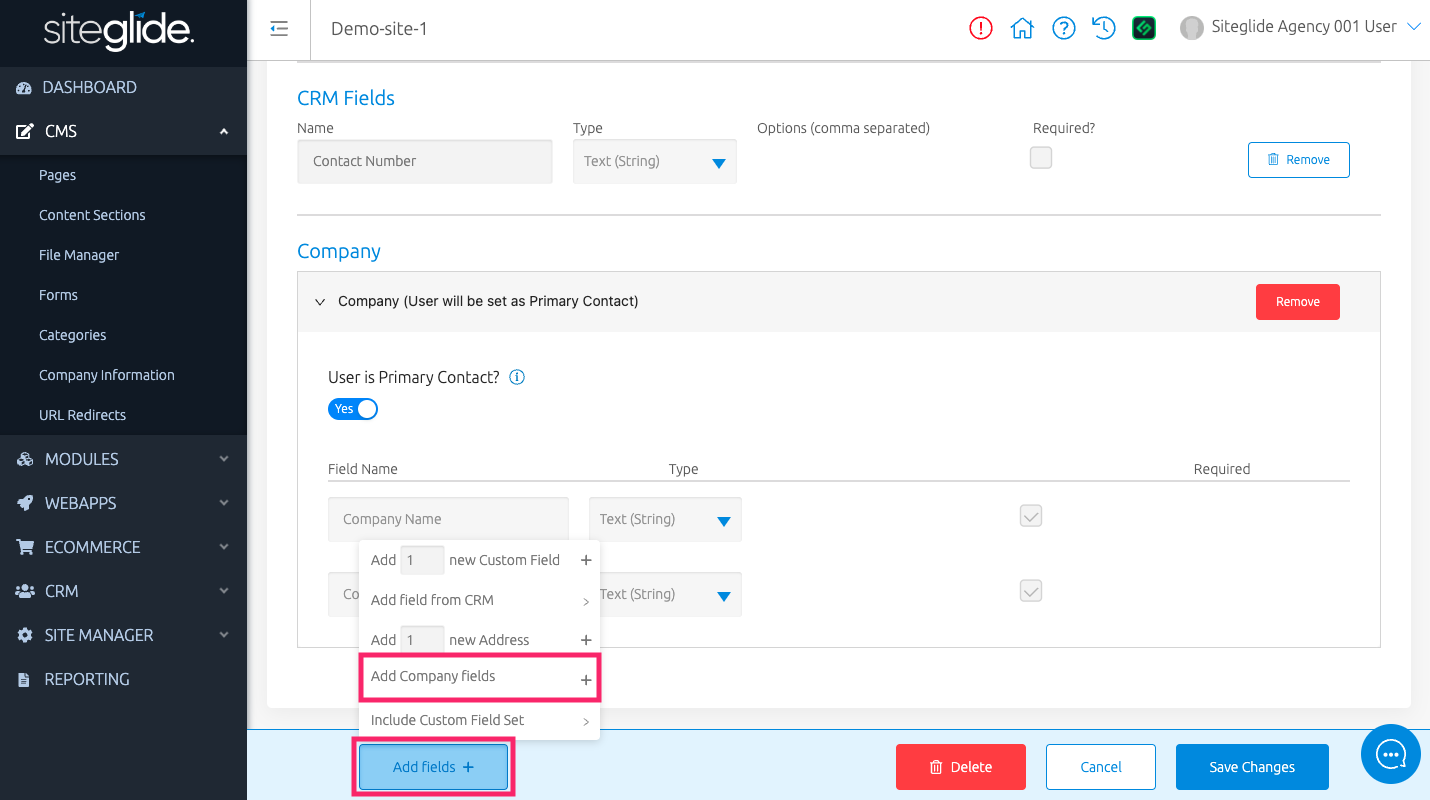
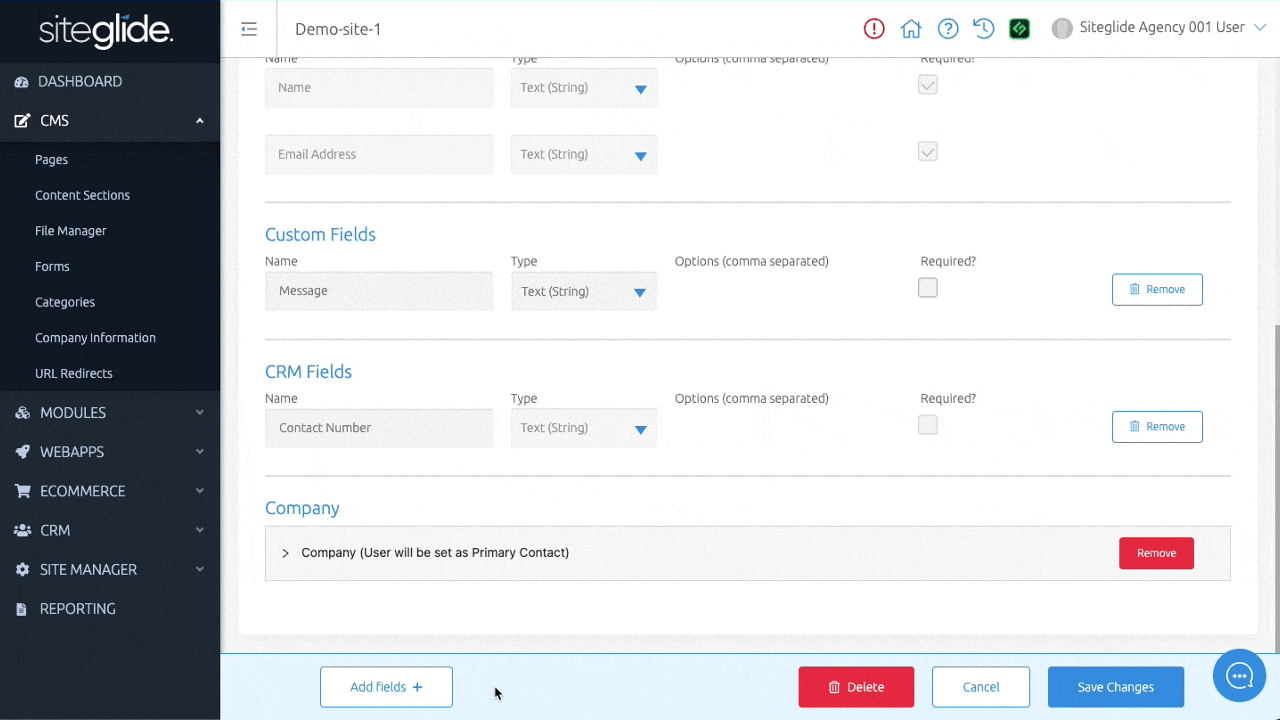
Adding Company Fields from CRM
This includes fields to enable your Forms to create Companies within your CRM and link this to the User submitting this Form.
Select "Add fields +" to choose "Add Company fields".
In the field list you will see you can edit the following option:
- User is Primary Contact? - The User that submits the Form will be set as the Company's Primary Contact
Adding Custom Field Sets
These are Custom Field Sets that already exist within Site Manager for your Site.
Select "Add fields +" to choose "Include Custom Field Set". Here, you can choose which set you'd like to add to your Form.
If no CRM Custom Fields are available to add, you can create some. Find out more: Custom Field Sets
Adding Secure Zones
Navigate to the next tab along, this is called "Secure Zones".You can add a Secure Zone to this Form to turn this into a sign-up Form.
Clicking into the field provided, you can use the dropdown to add any existing secure zones on your site to this item.
Alternatively, backspace or “x” can remove any unwanted secure zones.
When you save your Form the necessary Secure Zone liquid will then be added to the Form's default layout for you to copy into any custom layout.
If no Secure Zones are available to add, you can create some. Find out more: Creating A Secure Zone
Adding Payment Methods
Navigate to the tab labelled "Payments".
You can use Payments to set up methods of receiving payments/donations from customers.
You can use any of the following payment methods with your Form:
- Standard Checkout - When users are purchasing product(s) from your eCommerce site
- Quote Only - When you'd like users to ask for or input a number to quote for the product(s) they'd like
- Basic Payment Form - Used commonly as donation Forms, or the like.
- Subscription - When you'd like to set up Subscriptions with recurring monthly payments
Simply toggle "Use as a payment form?" and select a method to use. When you save your Form the necessary Payment method liquid will then be added to the Form's default layout for you to copy into any custom layout.
Alternatively, leave it as "No" if you do not want to add a payment method.

Automations - Autoresponder
Each new Form comes with an Autoresponder Automation set-up ready. A Form Autoresponder is an email sent to the site visitor who fills out the form.
Manage Key Settings
- From - Enter an email address that this will appear to be sent from (i.e. noreply@mydomain.com)
- CC - Additional emails that you'd like this to be sent to
- BCC - Additional emails that you'd like this to be sent to
- Reply To - Enter an email address that you'd like users to reply to
Note: You can enter multiple addresses into these fields (To, CC, BCC, Reply-To) using a comma-separated format, for example: developer@siteglide.com, client@siteglide.com or: Developer developer@siteglide.com, Client client@siteglide.com
- Subject - Subject of email
- Template - Leave as blank or select a template to use. If there are no templates showing, you can find out how to create one here
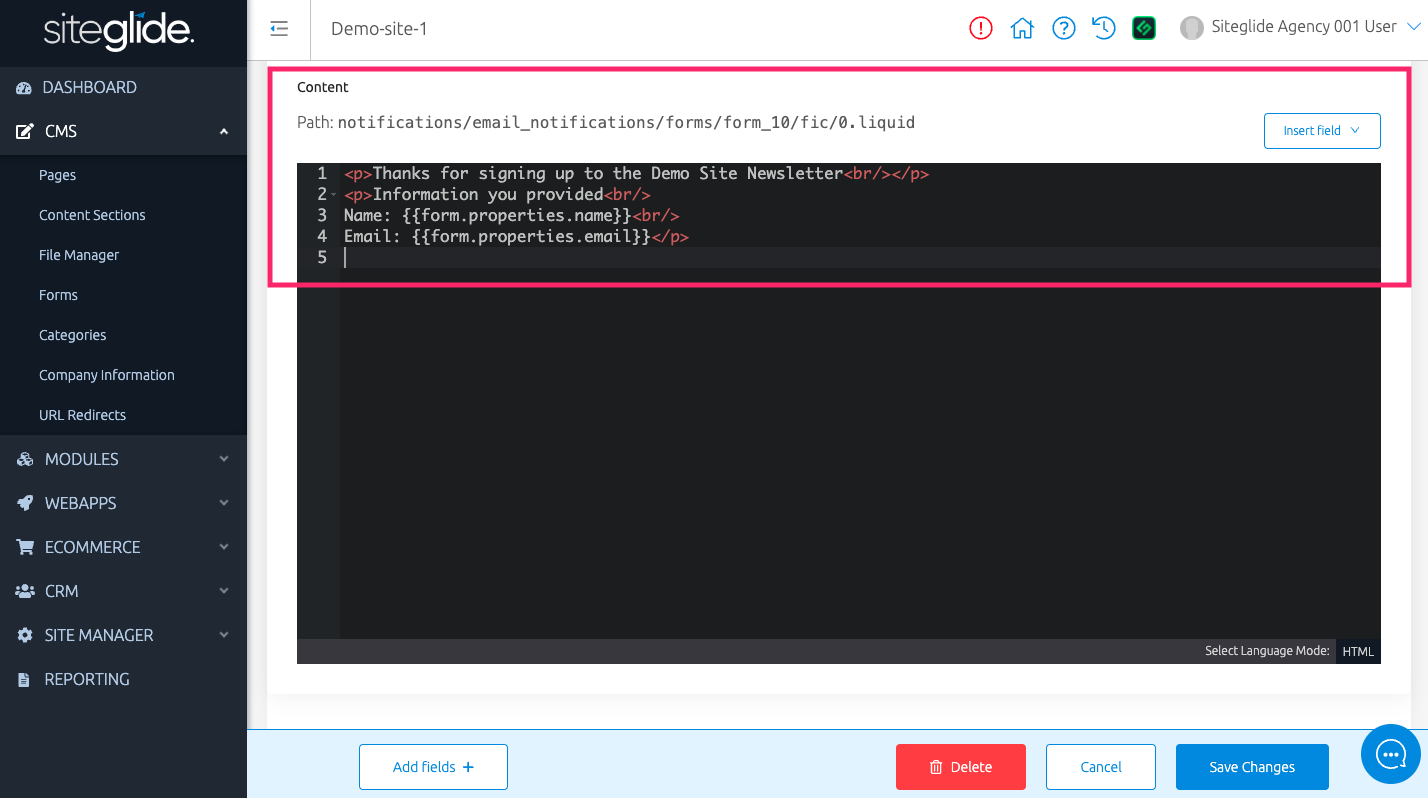
- Content - Provided as Code view, simply create your email content by using the "Insert field" to insert any liquid needed for your Form fields.
Autoresponder Layout
By default, the following fields are automatically added to Autoresponders:
- Name: {{form.properties.name}}
- Email: {{form.properties.email}}
You can also add other fields using the "Insert Field" dropdown, such as:
- user_id (also known as Submission ID): {{form.id}}
- orderid (used for eCommerce Forms): {{form.properties.orderid}}
- And any other fields relevant to this Form.
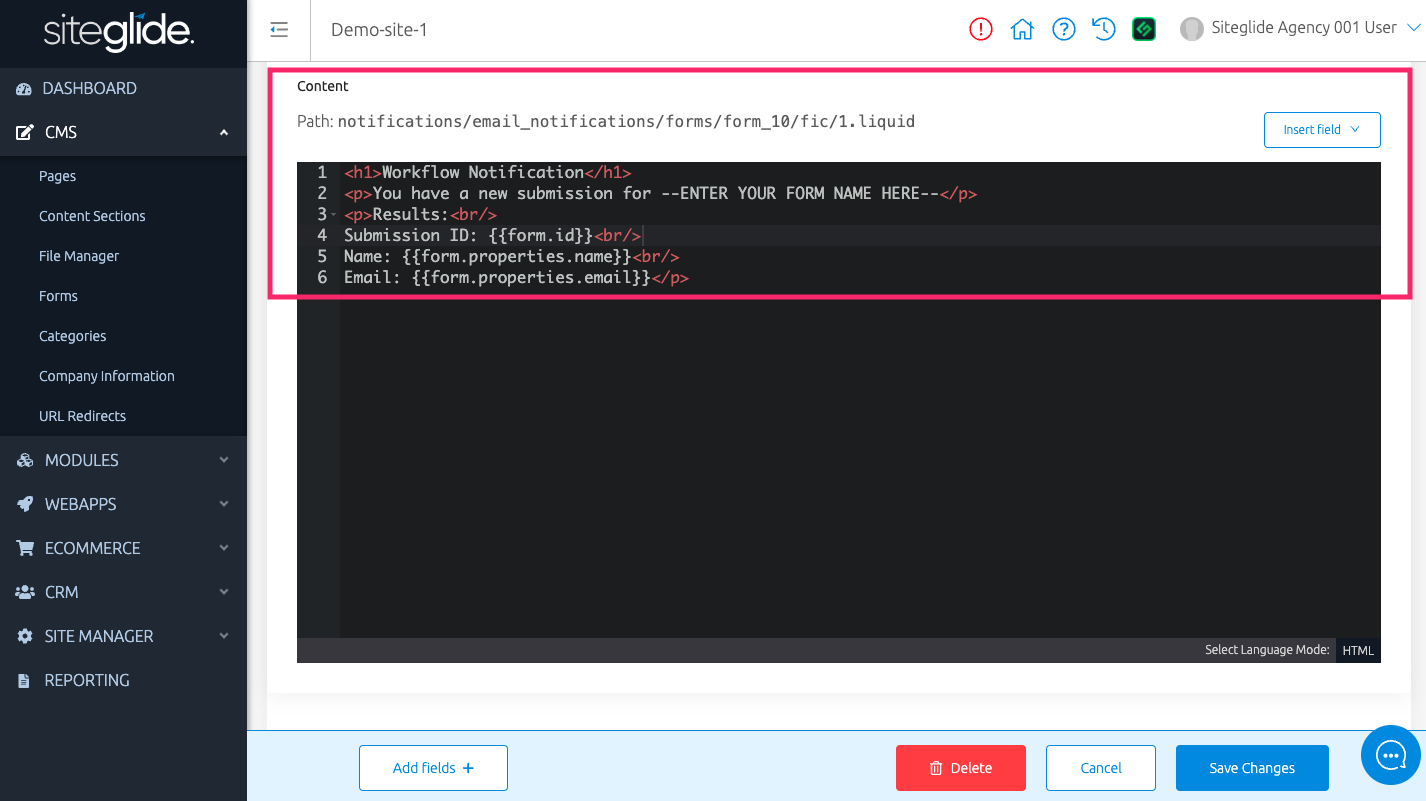
Automations - Workflow
Each new Form comes with a Workflow Automation set-up ready. A Form Workflow is an email sent to site administrators to notify them of a new Form Case (submission).
Manage Key Settings
- From - Enter an email address that this will appear to be sent from (i.e. noreply@mydomain.com)
- To - Enter an email address that this will be sent to
- CC - Additional emails that you'd like this to be sent to
- BCC - Additional emails that you'd like this to be sent to
Note: You can enter multiple addresses into the TO, CC, BCC & Reply-To fields using a comma-separated format, for example: developer@siteglide.com, client@siteglide.com or: Developer developer@siteglide.com, Client client@siteglide.com. You cannot add multiple to the FROM field.
- Subject - Subject of email
- Template - Leave as blank or select a template to use. If there are no templates showing, you can find out how to create one here
- Content - Provided as Code view, simply create your email content by using the "Insert field" to insert any liquid needed for your Form fields.
Workflow Layout
By default, the following fields are automatically added to Workflows:
- Name: {{form.properties.name}}
- Email: {{form.properties.email}}
You can also add other fields using the "Insert Field" dropdown, such as:
- user_id (also known as Submission ID): {{form.id}}
- orderid (used for eCommerce Forms): {{form.properties.orderid}}
- And any other fields relevant to this Form.
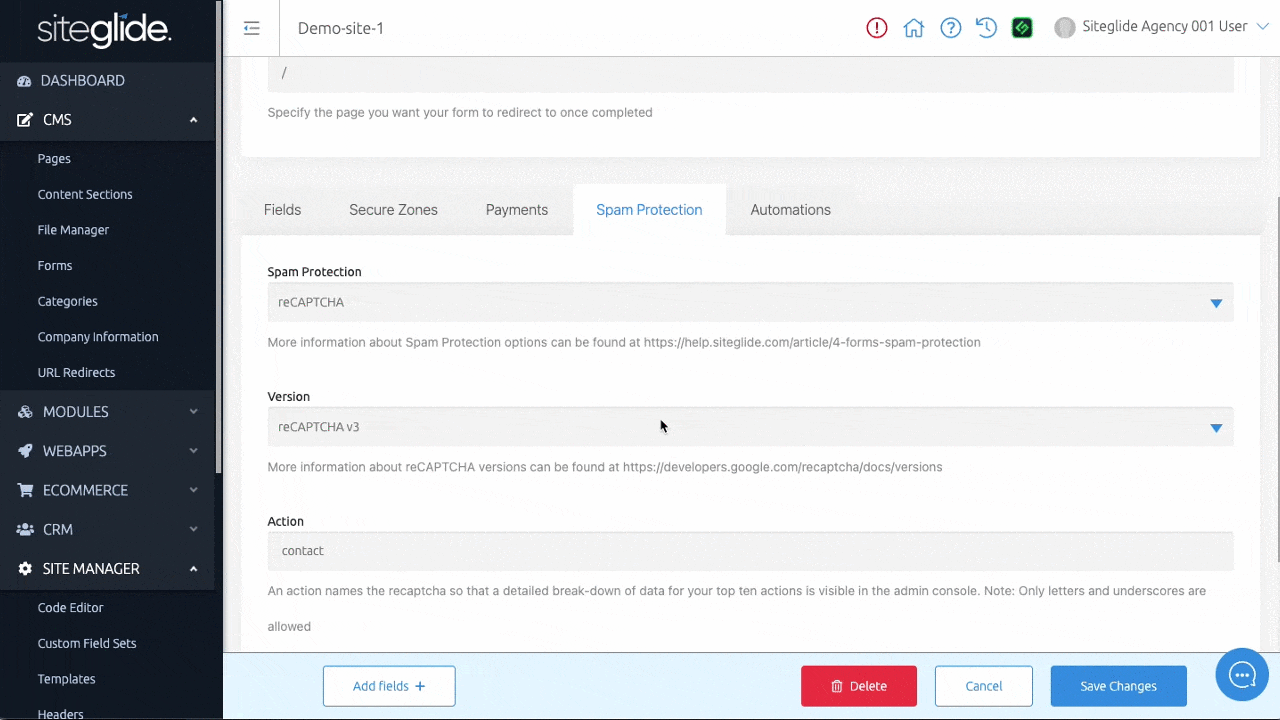
Spam Protection
Navigate to the tab labelled 'Spam Protection'.Here you can choose what type of spam protection you want on your Form.
- hCaptcha - This is the default option for all Forms and is recommended by both Siteglide and PlatformOS. This option will offer the best protection from spam and is fully integrated with the platform at no cost.
- reCAPTCHA - This is an alternative to hCaptcha, and is a service offered by Google. To use reCAPTCHA you must enter some extra details after choosing the option, including setting reCAPTCHA keys in Site Manager>Integrations. This spam protection option will generate usage in the form of API Calls.
- None - This option is not recommended for any public-facing form, and will leave you open to spam attacks
Check out the Forms - Spam Protection doc for more info.
Saving And Editing
Once you have included this information, click on "Save Changes".
From here, you can click either the name of a Form to see Form Submissions, or the cog-wheel icon on the right-hand side to edit this Form's structure.
Adding Forms To Pages
Once we have completed creating our Forms, we can start enhancing our site by outputting these onto our Pages.
Form Layouts
Where Can You Find Form Layouts?
While viewing your Site Admin, use the left-hand menu to click "Site Manager" and expand the sub-menu. Next click on "Code Editor" to view and edit all code files within this Site.
You can find these layout folders within Code Editor via layouts > forms > formID. e.g. for this example Form, this can be found via layouts > forms > form6 (Get In Touch).
When a Form is created, a default.liquid file will also be created. This will automatically update to reflect changes to the Form made in Admin.
However, custom layouts will not. You have full control over how you build this.
Simply right-click the folder for your Form, "create file" and insert a name with the ending of .liquid. For example - custom.liquid. Alternatively, you can use the icons on the right-hand side when you hover over the folder name.
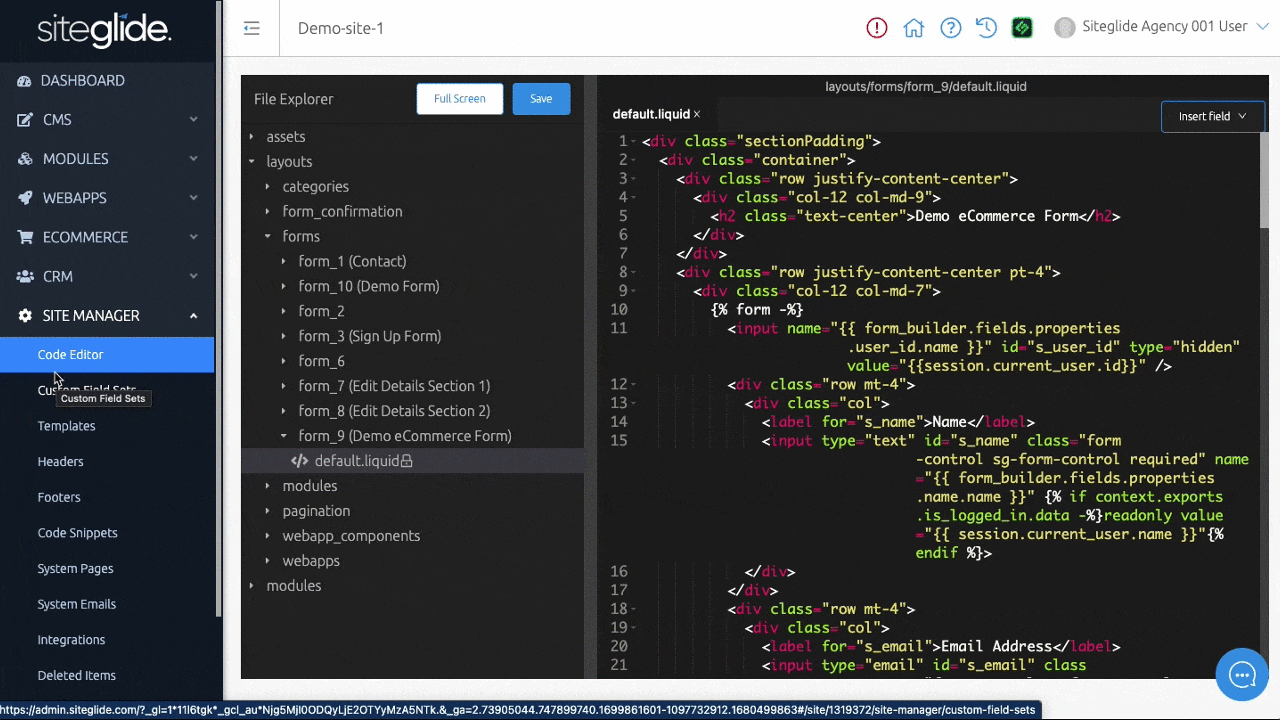
There are some important aspects that you will need to include in any custom layouts, such as:
{% form %}tag at the beginning of your Form layout and{% endform %}tag at the end
Note: You can add an ID or class to this Form tag by following this format:{% form, html-id: 'test', html-class: 'test2' -%}
- Any required and additional fields you'd like to add from your Form.
- You can use the dropdown "Insert Field" in the top right-hand corner of the Code Editor to insert these, or copy these from your default layout.

Optional - Using With Studio
Studio by Siteglide offers a best practice, Bootstrap 5 based, design and development process to rapidly build far more than just websites.Find out more: Studio by Siteglide Introduction
We can utilise Studio on Pages, along with WebApps, Modules, and Forms.
We begin in Code Editor setting up the file structure for our custom layout. You can edit existing custom layouts or create new layouts.
Heading over to the Studio layout library, we can choose a layout that we’d like to use and copy this. (sg-form-1 , sg-form-2 , sg-form3)
Paste this into your custom layout file.
From here, you can swap any dummy text for liquid using the dropdown provided, and refer back to your default layout to compare.
Save this layout, and you’re ready to output this to your Pages.
Outputting With Toolbox
Within any Page Code view, Header, Footer, Template, Content Section, and Code Snippet, is a Toolbox on the right-hand side.
Simply select “Forms” (here, we’ll use 'Get In Touch').
- Form - Choose a Form to output
- Layout - Select a Form layout to use
“Insert” to create and add this liquid include to an area of your choice, which adds your Form to your Site. You can also add additional parameters to this liquid, such as:
- upload_dir - Formatted example: images/all/ - Default = images/{{id}}/
- layout - Name of layout you want to use e.g. my-own-layout - Default = default
Would you like to add additional functionality making this more bespoke for your needs?