

Prerequisites
- You have already followed the previous Article How to Back Up your Site and have a repository with a master branch and at least two commits (each containing a different backup of your Siteglide Site's codebase)
- You are familiar with Siteglide CLI, along with the sync, pull and deploy commands
Introduction
In the article How to Back Up your Site, we showed you how you can use GitHub to store backups of your Siteglide Site's code.
Here, we'll look at how to create a branch based on the old backup of the Site - so you can browse the code, or deploy it to your Siteglide Site.
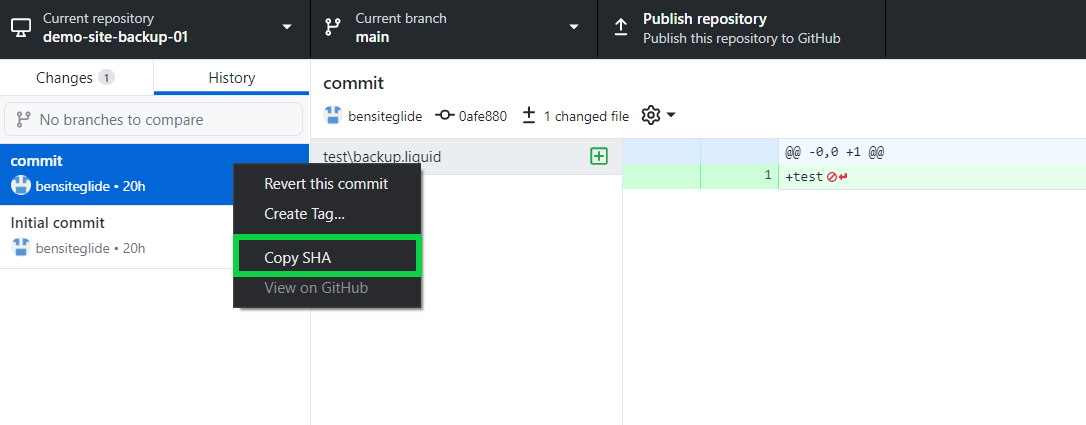
Step 1) Getting your commit's unique ID or "SHA"
We'll need to get the unique ID of the commit you'd like to create a branch based-upon.
To do this go to GitHub Desktop and open your repository, then locate the "history" tab- this should display all of your commits.
To get the unique ID of your commit, simply right click your commit and select "Copy SHA", this will copy the ID to your clipboard.
Step 2) Checkout the old backup of your site
In the terminal, use the command: git checkout <sha> to revisit the old backup commit of the Site, where <sha> contains the commit's unique ID.
Note: At this point, you may receive a warning about being in a "detached head state". This is nothing to worry about, it's Git's way of saying that any changes you make will not be saved- the easiest thing is to move straight on to step 3!
Step 3) Create a new branch based on the commit you're checked-out to
The terminal command git branch my-new-branch - creates a branch based on the old commit you're checked out to.
Step 4) Checkout to your newly created branch
The terminal command git checkout my-new-branch - checks out to the specified branch, changes will now be tracked to this branch.
Your code will now display locally just as it was when you backed it up and committed originally.
You can browse, and as we've created a branch, you can also make any edits you need to and commit them. This might be useful if you need to revert code and deploy your backup but know some specific updates which are needed first.
Step 5) Optional - Deploying your backup to a Site
Finally, what if you wish to actually revert and replace the current code on your Siteglide Site with the historical code from your new GitHub branch?
As always with deploying, the normal warning applies. Any files which exist on the Site will be overwritten by the changed files you are deploying. You must be absolutely certain that you wish to overwrite these files before continuing.
Safety Checklist
To avoid deleting important code from the Site, think:
- The deploy will wipe any code written since this backup from the Site, is this acceptable?
- Check with your colleagues + Client, are they all in agreement that the backup should be restored? Somebody may have added something new since you last checked which should be kept.
- Have you stored a brand new backup of the Site in case you make a mistake?
To deploy- make sure you are checked out to the branch you wish to deploy, then run the Siteglide-CLI command to deploy. You do not have to deploy to the original instance you originally pulled from.