

Siteglide is now an app on Zapier, meaning you can now connect to more than 1,300 apps to give you more flexibility than ever in achieving what you're aiming for.
What is Zapier?

Zapier is an online automation tool that allows you to connect two or more apps to automate repetitive tasks, and anyone can do this.
On Zapier, you can create Zaps that begin with a trigger and will complete an action based on this trigger.
What is a Zap?
A Zap is an automated workflow between your apps, made up of a trigger - an event that begins the Zap, Zapier will monitor the app for that event; and an action - the event that completes the Zap, what you want to happen once Zapier comes across this trigger.
For example, Zap that adds new users that have filled out a form on your site to be added to your Mailchimp list. The trigger is a new user has just filled out a form, and the action is adding this user to your Mailchimp list.
For more information on how to use Zapier, check out their getting started doc, here.
Setting Up With Siteglide
Setting up your Site with Zapier means you can take advantage of this fantastic automation tool and start saving time.
You can add your Siteglide Site this way to begin with or go ahead and add it on the go in making your first Zap, below.
Where can you do this?
To begin, head over to Zapier, and create an account. Once you have done this, head over to Siteglide Admin app on Zapier, you can do this by using the left hand menu > My Apps > 'connect new account', search for Siteglide Admin. This will take you to a new window where you can enter details to connect your Site on Siteglide with Zapier; your Siteglide admin email , your Site ID, and your Siteglide admin password.
Your Site will now show up under 'My Connections'. One last thing, make sure to test this connection by clicking 'Test' on the right hand side of your Site's name.
Making Your First Zap
To make your first Zap, choose an app that you'd like to connect with Siteglide.
Click here to see apps that other people have connected with Siteglide.
Since we've connected with Zapier, this has opened up many doors of being able to hook up your Site to MailChimp or ActiveCampaign, or any others of the like with ease, enabling you to use well established email marketing providers with Siteglide.
For this example, let's use connect our Site to MailChimp.
Using your dashboard or head to the left hand menu and click on 'Make A Zap'.
Choose your desired trigger, and your desired action. Then click 'Connect Siteglide Admin + Mailchimp' .

This will redirect you to setting up more information for this Zap.
- Search for Siteglide Admin
- Choose a trigger
- Connect your Siteglide Account (or choose a connected account that you added from earlier in this doc)
- Test
- Search for your app (in this case, Mailchimp)
- Choose your event
- Connect your Mailchimp account
- Fill required fields - 'Audience' and 'Subscriber Email'
- Test & Continue
If the test comes back successful, a pop up will show saying 'This Zap is ready, turn it on?', turn this on and you are ready to go.If the test comes back and has failed, it will tell you why and you can fix this.
https://image.siteglide.com/12uPqkkm
Make sure to name this Zap and you can click the arrow in the left hand corner to take you to your 'Zaps', this is where any draft and working Zaps will be.
Adding Filters To Your Zap
When using our Zapier app with email marketing providers, you may want to select only users that have opted in to your newsletter to be sent to your recipients list at MailChimp or ActiveCampaign, etc.
Using your dashboard, head to the left hand menu and click on 'Make A Zap'.
You will then be redirected to an area where you can begin setting up a Zap.
- Search for Siteglide Admin
- Choose "New Form Case" as your trigger
- Click "Continue"
Customise Cases
- Form ID - Choose your form (containing a checkbox field)
- Filter - Copy and paste the following
{ name: "form_field_[insert Form ID]_[insert Field ID]", array_contains:["[insert Checkbox Option]"] }
Your Form ID, Field ID, and Checkbox Option can be found in Code Editor > Layout used for this Form > optin element within this Form.
This will be in the format - "formfield13true" .
- Form ID = "1"
- Field ID = "3"
- Checkbox Option = "true"
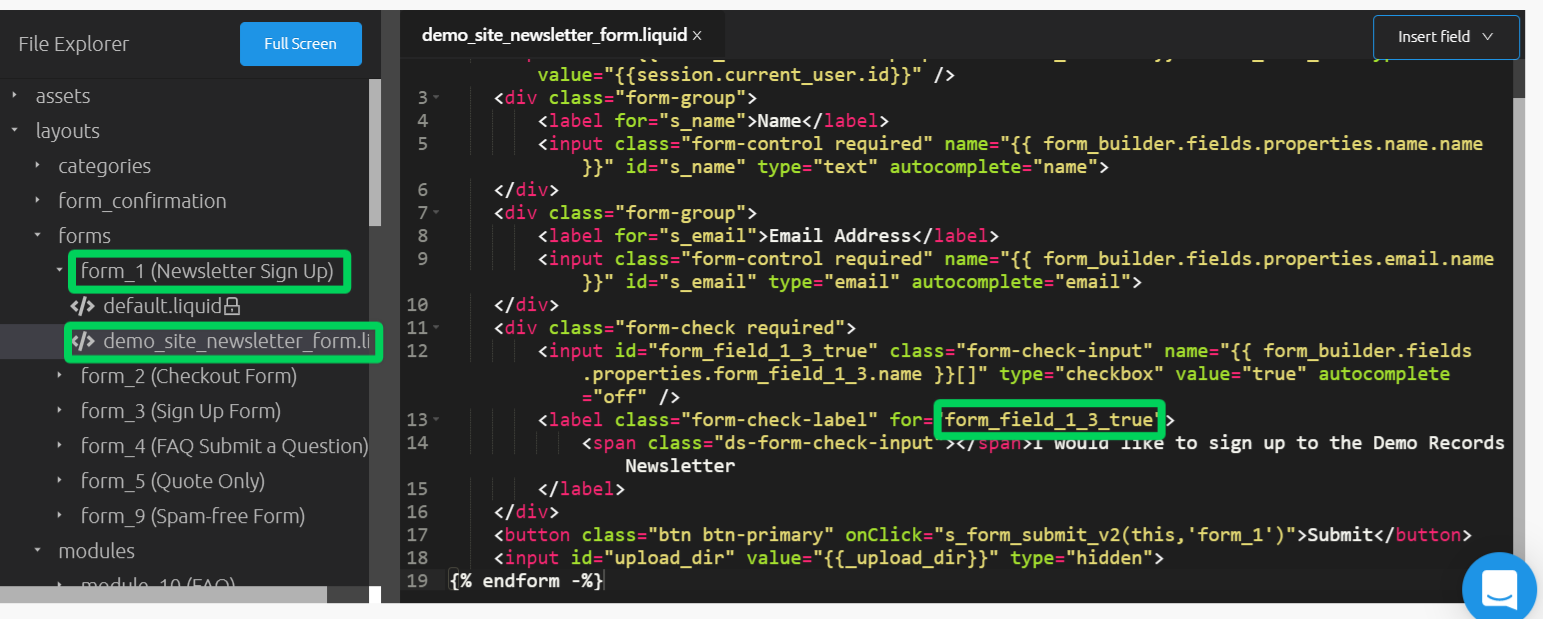
For this instance, it would be:
{ name: "form_field_1_3", array_contains:["true"] }
- Search for your app (in this case, Mailchimp)
- Choose your event (in this case, "Add / Update Subscriber" )
- Connect your Mailchimp account
- Fill required fields and any other fields you wish to fill in - 'Audience' and 'Subscriber Email'
- Test & Continue
If the test comes back successful, a pop up will show saying 'This Zap is ready, turn it on?', turn this on and you are ready to go.If the test comes back and has failed, it will tell you why and you can fix this.
Make sure to name this Zap and you can click the arrow in the left hand corner to take you to your 'Zaps', this is where any draft and working Zaps will be.
